Moto G Screen Replacement –
My Detailed Walk-through with Pictures.
Dead LCD Touch Screen on a Moto G (Motorola)
Most Moto G screen replacements only show you the take-down part, without actually removing the screen from the frame. So, when I had to do my second Moto G screen replacement, I thought of everyone out there who might like a full walkthrough, like I had searched for, before I toughed it out and was successful.
Note: I’m using my fingers and nails for this replacement, along with a torx screwdriver, an
electric hair dryer, and double-sided tape.
Hope this helps!
P.S. Please DON’T waste your time trying to replace ONLY the front glass on the Moto G. Yes,
you can buy “just” the front glass, but it’s almost impossible (read: ruin your lcd) to remove
the LCD from the phone. If you look at the first picture here, that’s what happened to the
phone. People dropped it, the LCD was fine, but the glass needed replacement. Unfortunately, the glass is bonded onto the lcd, and you destroy the LCD even when using a fine wire to “try” and pry the two apart with heat. (Maybe, someone has succeeded, but it’s just a few more dollars for a complete lcd/front glass set, which really saves you time and energy and heartache, since your phone is fixed shortly after you get the parts. ) (I’ll admit, I’m the one who tried to change the front glass only, and destroyed the lcd in the process.)
<_________________________________________________________________________>
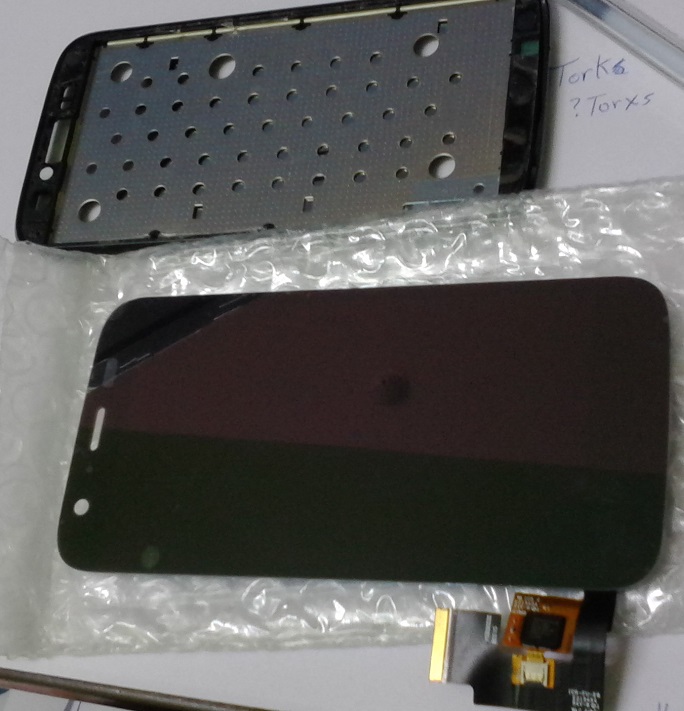
Step 1: Here’s the screen. (First pic at the top ^ ) Yeah, gotta put a protective case on these things. They’re tough, but the screens just die when they hit the concrete floor from a 4.5 foot drop…
Step 2: Remove the back case.
Moto G Back Case
Step 3: pry off the “second” back case/battery cover with your fingernails or a thin pry tool
–> Start from the bottom/lower side area, and press inward. Then work your way around the
phone, ending at the top. (Always end at the top for the Moto G. Works better that way.)
(Alternately, when putting these covers back on, start at the top and work your way to the
bottom. )
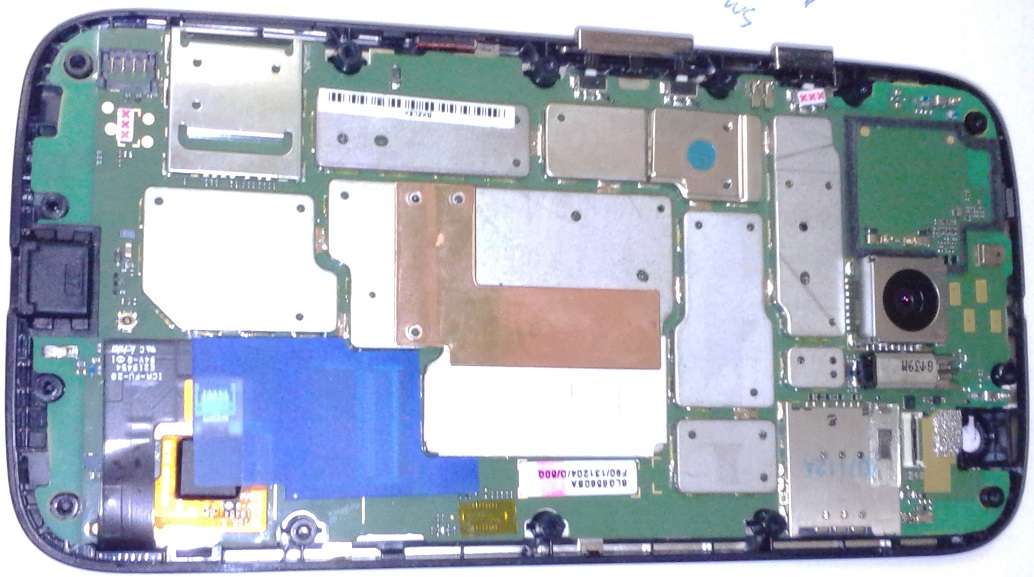
Step 4: ^ Now that you’ve got the cover off… What’s this? The battery is attached to the phone
with a ribbon cable, and a strange connector. This is a “snap-on, snap-off” connector (My fancy
desciptive name) Just (carefully and gently) take your pry tool, or fingernail and lift the
connector up as shown in the picture. It will pop off.
Also, you’ll see that the phone’s volume and power buttons are simply sitting in their places
on the phone, and by now, they may have popped out already. Simply take ’em out and set them aside.

Step 5: Huh? This battery has a good sticker (that’s what it looks like) which really helps to
stick it to the phone’s inside parts… Don’t worry, get a flat pry tool, or use your fingers.
(The first time you ever take the battery “off” of the phone, it’s really, really, reallly, (Did
I say REALLY?) stuck on their. Don’t worry though, You just have to pull it and pull some more.
There’s no parts attached to the battery, as shown in the screen shot. Just keep pulling it, and
it’ll eventually come off cleanly.
Step 6: Next remove the front camera (selfie one) by FIRST lifting up the black (fragile)
latch/clip, which will pop up after some pressure on it. This releases the camera’s ribbon cable
from the clip’s slot, where it’s inserted. Make sure you don’t lose this small camera module.
** It’s important to note that the ribbon cable’s latches/clips are not really that strong,
simply due to their size. Be careful not to break them off by using a sharp object to try and
pry them up. Slow and steady does the trick.

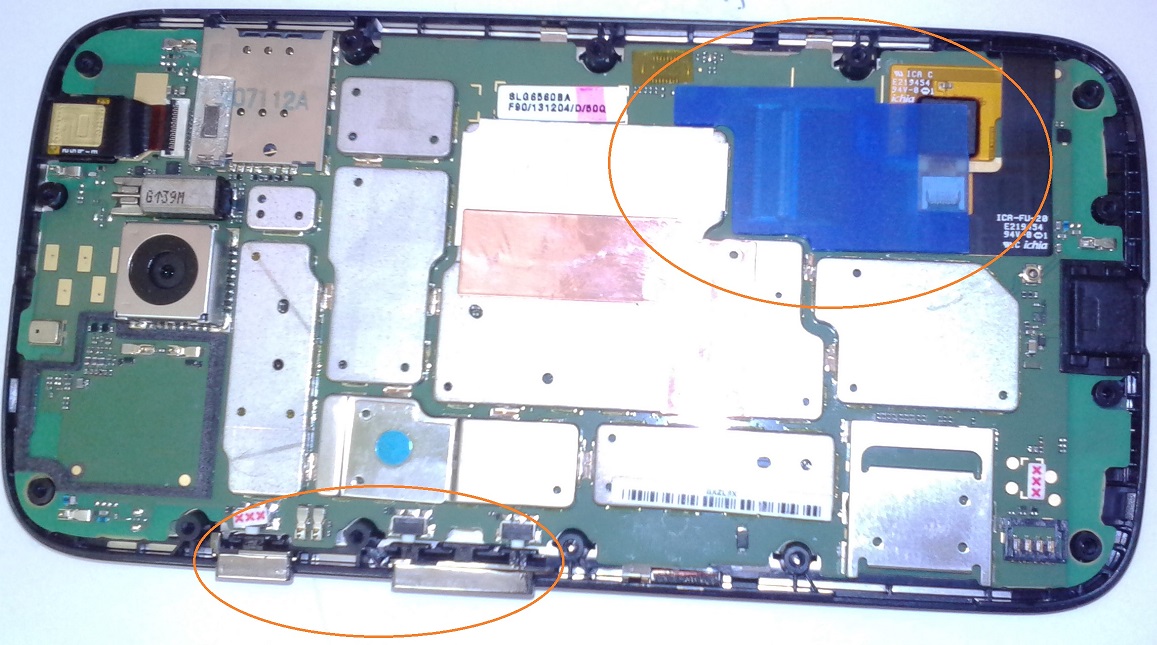
Step 7: See that Blue colored cover? Just remove it. It’s not glued or anything, and is just
there for? damage protection? (Ribbon cables are fairly strong, but (honestly) easily torn if
you’re not careful.)
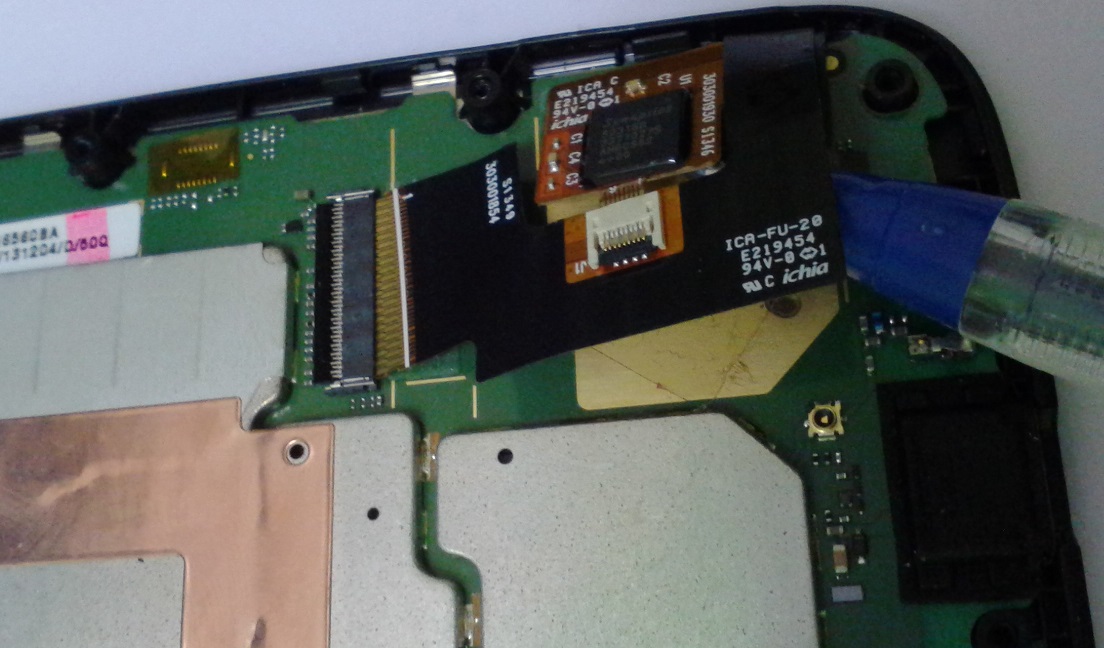
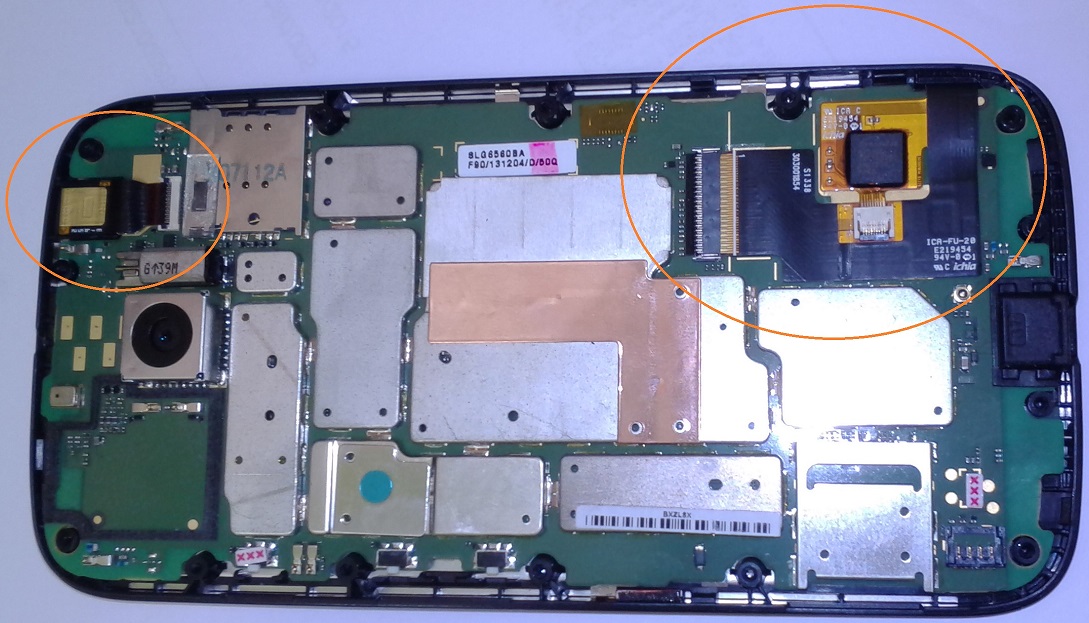
Step 8: Within the Orange circle in the screenshot lie the LCD screen’s power and video cables.
** Read the next part of this paragraph before doing anything with them!
Carefully note that there’s a large one, with another clip/latch, (black colored) which you
must FIRST flip up, and then carefully remove the large ribbon cable from. Notice, secondly,
that seemingly attached to this large ribbon cable is the other smaller cable. You can safely
leave that one attached as it is.
These two are “glued” with a stick substance, which you need to carefully pry off. Use a flat
pry tool, or anything (preferably non-metal) flat to carefully pry the ribbon cables from the
system board, where they’re held fast with the adhesive. This takes time. Usually, you won’t be
actually caring about these, since they are attached (see the cables, which go into the front
side of the phone, and are ONE with the lcd/touch screen.) So, if you break these, while
removing, it’s probably ok, since you’re replacing the screen itself, anyway…. So just relax!

(2 pics)
Step 9: Here, we see the battery taken off, the camera (front) removed, the ribbon cables (and
their blue protective cover removed) and these same ribbon cables moved off to the side
(essential for ease of next step.) Just carefully move the cables to the side and out of the
way.
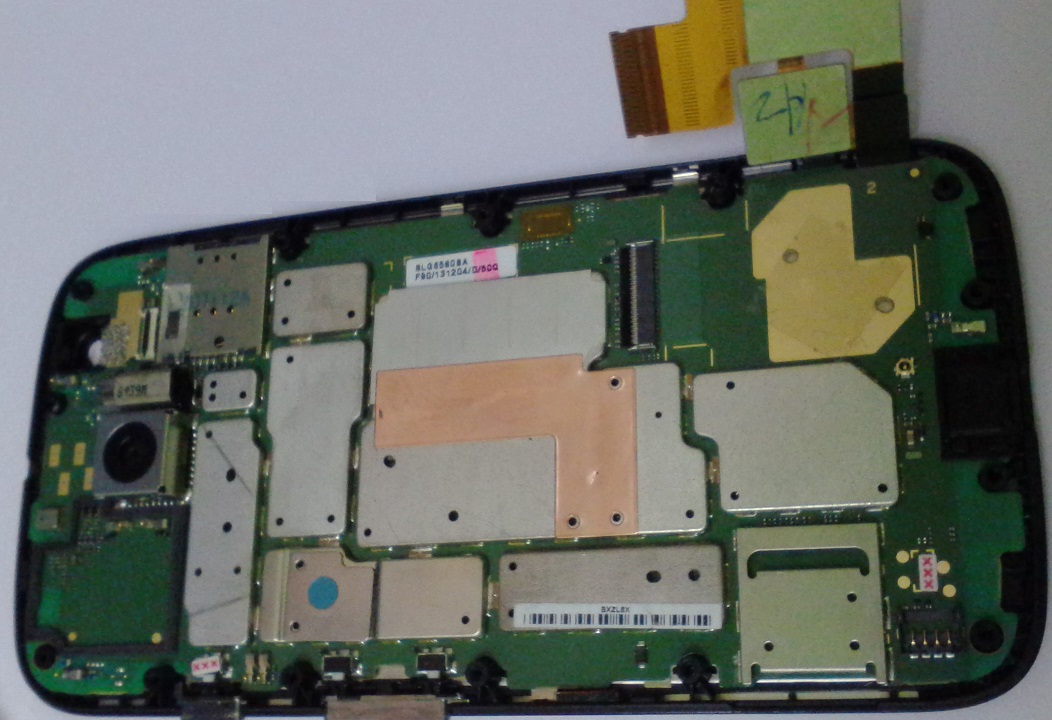
Step 10: You can see with my pen, that I’m gently lifting the phone’s inner guts (the
mainboard) by carefully going to each corner with my pen (or use a pry tool) and gently prying
it up. There’s nothing gluing or holding down this mainboard, and (Hurray!) no surprises on the
other side. (as in: no more ribbon cables to watch out for and nothing else connected underneat
this board. Just pry and lift this board off the lcd/front screen and frame, which it’s lying on
top of.

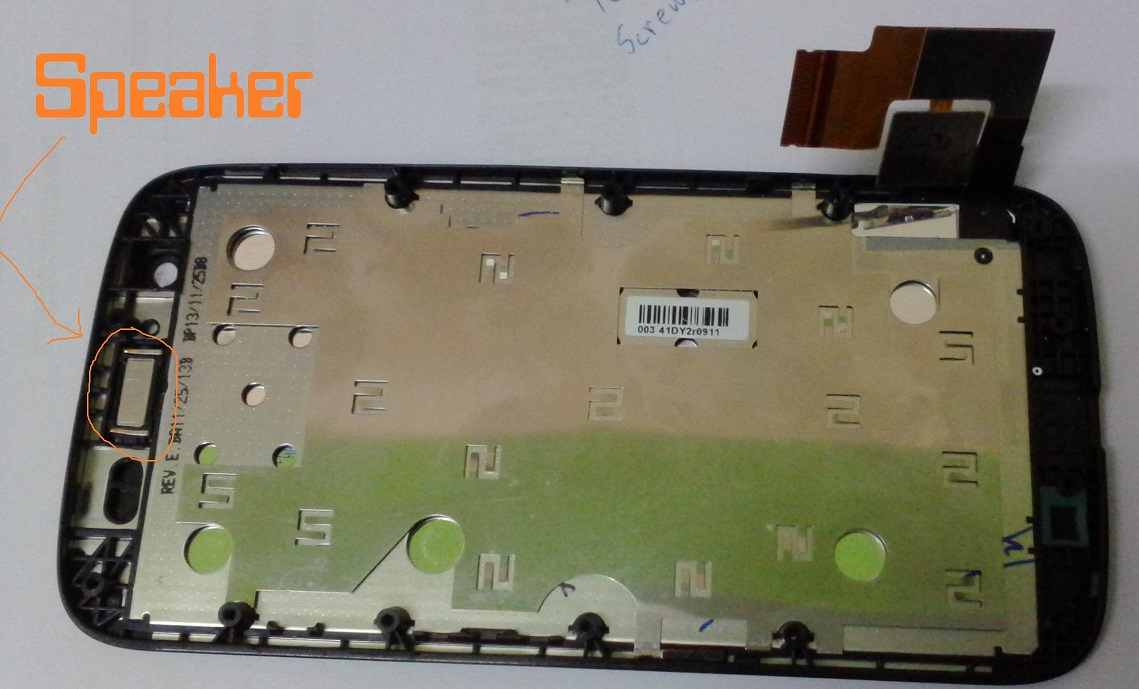
Step 11: See this Speaker/loudspeaker for your phone inside the orange circle. Don’t forget
this! It’s going to be partially stuck to the front of the phone’s front glass, with a grill on
the very front to prevent dust, etc from getting into the speaker. I recommend taking something
which is a bit pointy and prying it up. (In both my replacements, the speaker has come off
separately from the front grill. You can easily glue them, or simply place them back together
when putting it back on the new screen in the re-assemly time.
** Point to note down!: Notice the pointy “ends” of the contacts (Those metal arms sticking up)
are pointing up! If you install the arms pointing down, then the speaker wont’ work, and (in my
second repair job) the phone won’t boot either. Then you have to take apart the phone again,
until this step, pry out the speaker, and then put it back 180 degrees from where you had it. **
Step 12: I have no picture of this next step, but essentially, the phone is glued with a
strong adhesive to the plastic frame. To loosen it up, take a hair dryer, and over the course of
8-12 minutes, run the dryer back and forth over the front glass, to heat up the glass and loosen
the adhesive… (Yes, be really patient and know that the glass gets really (read: burn your
fingers) hot. Then you can either pry out the glass from the front of the plastic frame, or try
to push it out through the circular holes from the back…
(Sorry, no pics of this. Just read the notes again and try it for yourself, with patience. The
screen will come out “fairly” easily, once the adhesive inside is hot enough. (It’s really just
a sticky glue sort of stuff.)
(Good Luck!)
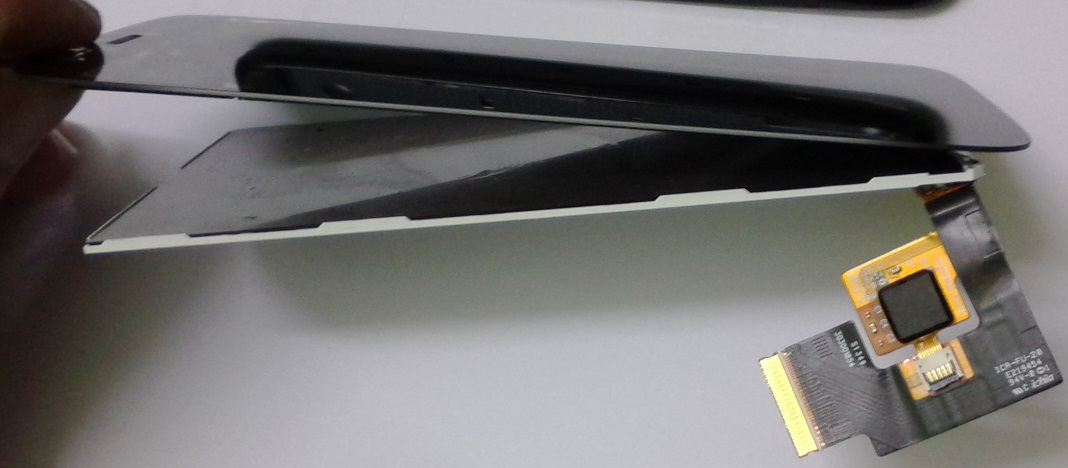
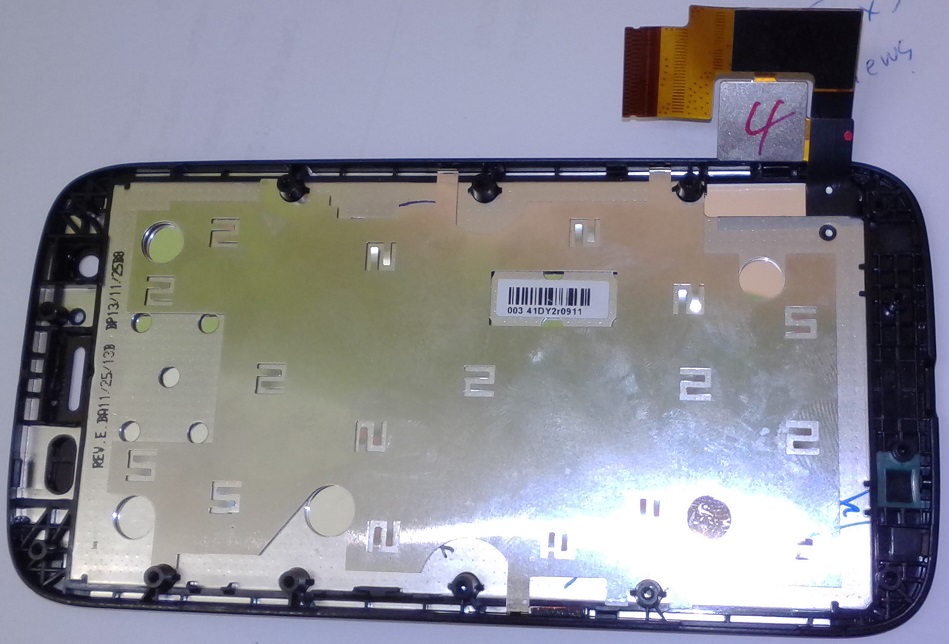
Step 13. Now you see the frame, separated from the actual lcd (shiny mirror part – back of the
lcd screen) and the front glass. (LCD + Front glass are together.) Note that the lcd ribbon
cables are still “slotted” through the slot in the frame. Carefully work them out.
Step 14: Now the frame and lcd/touchscreen/glass are separated from each other. Do whatever you like with the lcd/glass part. Keep the frame. 😀
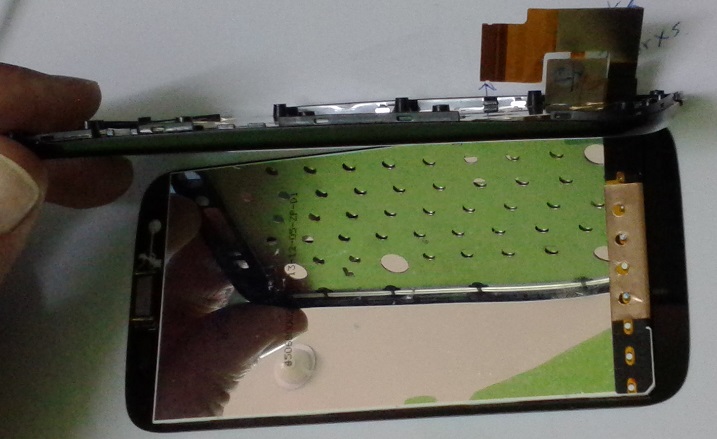
Step 15: Note: This picture is of the lcd/glass/touchscreen portion (ruined) when I try t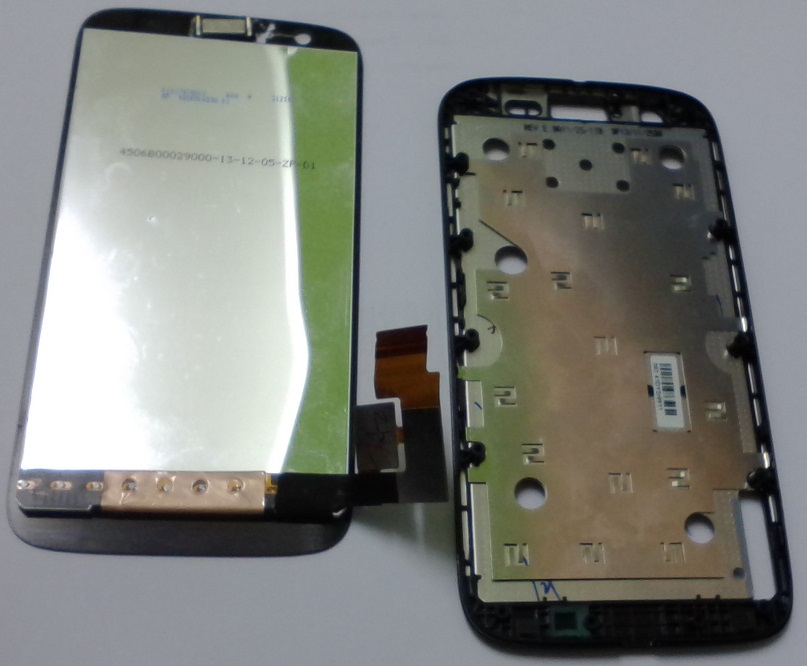 o
o
manually separate the two with a thin wire. The LCD portion is actually split in half, and you
can touch (perhaps Dangerous?) The “Liquid” portion inside of the LCD (Liquid Crystal Diode)
screen. Don’t even bother trying to replace the glass only (as I said before) since the lcd and
glass are bonded together with some awesome compound/adhesive.
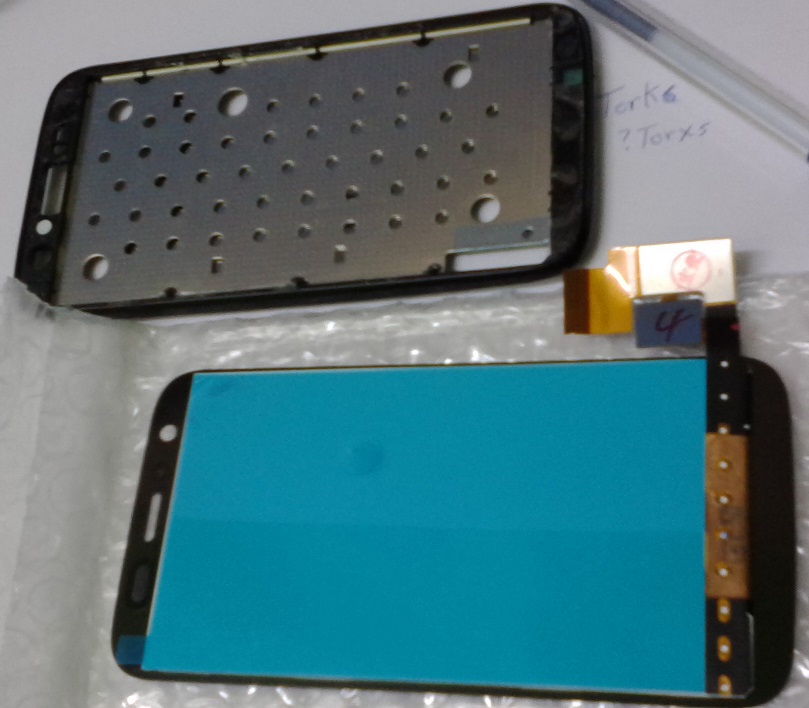
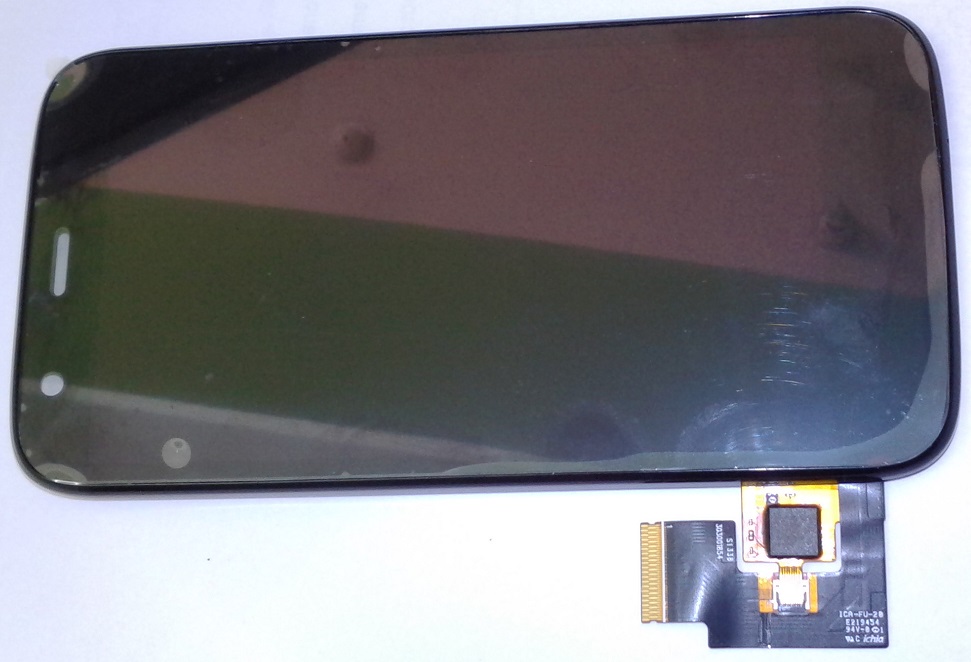
Step 16: Here, these two pics shows the new replacement lcd/touchscreen/glass for the phone,
sitting with the frame, and then we flip the lcd/glass over (for the second pic.)
Step 17: Clean off any old adhesive from the frame’s insides, where the glass will be sitting.
Then put the double-sided tape, and (if you want) a pin-drop (YES A VERY SMALL PIN-DROP- SO
small that you think it won’t do anything) of super-glue, to stick the phone’s glass screen to
the frame, later.
** Confession: I used only double-sided tape to hold my first screen replacement. That worked
fine until… the phone dropped on the floor, the screen then popped out, and ripped the
screen’s ribbon cables in half… So, I’ve added the (very very very small amount) of super-glue
to help hold the screen, in a more strong fashion for future drops…

Step 18: Carefully manuever and fit the ribbon cables through the slot in the frame. Also,
remove the protective backing on the lcd (in this pic, it’s the blue plastic cover). Then press
the new LCD down onto the frame, taking care to press gently, but firmly, all around the edges
of the screen to get it into contact with the adhesive/tape you’re using.

Step 19: Picture of what the frame and lcd will look like now.
Step 20: Flip the phone over and gently press the frame, in random places, down onto the lcd to further help the screen to get a good grip on the frame.
Step 21: Now carefully lower the mainboard back into the frame and gently press here and there to set it back in place.
Note within the orange circle on the screenshot, that this is a place to put some
adhesive/tape for the ribbon cables to be held there again. Not super-essential in my mind, but
it certainly won’t hurt to follow Motorola’s original design.

Step 22: When putting the ribbon cables from the lcd back in their slots, it’s more easy to do
so before you put the adhesive on the phone for them. You can put the adhesive first, if
desired, but it it’s really sticky, it makes it hardly to get the larger cable into the latch,
if you haven’t given it enough slack before pressing it into the adhesive you’re using.
Also put back the front-facing camera, and re-attach it’s ribbon cable.
Step 23: Replace the blue cover, and the power/volume buttons if you’ve not already done so.
Inspecting the power/volume buttons will so that one end is slightly longer than the other, and
it matches with the grooves for them in the side of the frame.
Step 24: Take the battery, and before (lightly) pressing it down onto the phone, match the
position of it’s ribbon cable’s connector to it’s place on the phone. Note that when you press
this connector down, it looks like it’s not directly on top of the spot where it fits in. I
tried getting it to go in several times, but realized that you have to move the connector from
the ribbon cable a little bit toward the frame (side) of the phone, so that it’s not directly on
top of the matching connection on the mainboard. Then it’ll pop-in easily. After that, lightly
press on the battery to get it stuck back on the mainboard.

Step 25: Take the battery cover, and starting from the top, gently press it back into the
groove which runs all around the fram for it. Simply press down from the top and move along both
sides (at the same time for both sides is easiest) and you’ll hear it crack and pop into place.

Step 26: Screw in those 14 torx screws again, ’till their hand-tight.
Step 27: Put on the back cover/case. (Again, start from the top. Place it right on top of the
frame, as it sits on there, and then move done the sides of the case to click in the rest of it
until the bottom.

Step 28: (The most nerve racking part: “Did I do it right?”) Press the power button, and see
the phone’s new screen turn on! 
Got some: Questions? Comments? Helpful Hints?
Just leave a comment for the rest of the world to benefit from! 😀
I did the above process to replace a broken lcd. Everything seemed to go well and everything on the phone seems to work, except the signal reception. Where should I look to see if I have messed up the antenna or radio?
Hi Terry, Good luck!
Sorry, I haven’t a clue, I have put these Moto G’s together, but I really don’t know where the reception/antenna area is. If you try holding the phone in different areas, you might be able to narrow it down, or do a Google search on this.
Thank you for the thorough directions and pics. Especially for the re-assembly steps. I ended up with a part leftover – a rectangular magnet, 5/16″ long. Any tips where that goes?… Also, I seem to have warped the frame a little in trying to pry out the glass, so the new glass doesn’t want to stay in place on one side. Guess I should try the super glue suggestion. Or maybe rewarp the frame, if that’s possible (I heated the frame and screen in a solar oven to loosen the adhesive). I’m not opposed to resorting to duck tape either. Last thing, I can’t swipe down from the top but appear to be able to do everything else. Maybe that is where the magnet comes in.
Hi,
Honestly, I’m not sure of which magnet you’re referring to. Perhaps you can post a picture of it, and we can try to identify it?
eunity3d,
thank you for the detailed instructions, found it when searching for a small metal rectangle that seemed glued to the mother board or display. When reassembling then motherboard into the frame, the magnet popped off the right or left edges. (I believe i was the side of the power, volume buttons.)
The phone seems to work without it. This metal recrtangle must have a purpose though.
Top edge swipe working here despite missing magnet.
http://justintime.studio/wp-content/uploads/2014/10/IMG_20141023_151454.jpg
At the power, volume buttons’ side to the very bottom, there is a metal piece seen smaller than the volume button and aligned with a flat large side to the display frame’s edge when projecting it to 2D.
This one is exactly like the other magnet that came loose such that that it may mean that these two magnets belong together to snap into contact (or to ensure alignment by repulsion?).
The part can also be seen on this picture opposite to the right top corner of the square (exactly horizontally mirrored):
https://d3nevzfk7ii3be.cloudfront.net/igi/IXoZd5kIr4Aae1UO.huge
Hi, nice explanations. I’ve just been through the replacement myself and now I’m getting a black screen.. with both the original and the replacement screen. The backlight and the digitizer are working, but I’m getting no display on the screen apart from a faint glow in darkness. Any ideas how to fix? thanks.
p.s. Suzieq – without getting a picture, this is most likely the ear speaker.
Hi Neuralnet,
Thanks for the comments and question. I think your screen’s lcd should be tested on another phone, or perhaps the phone’s logic board (mainboard/motherboard’s) connection to the lcd screen is not clipped in, or connected fully? I got this sort of screen, before fully connecting the lcd screen cable into the back of the phone, all the way in.
Hope this helps!
Hi,
Just wanted to say thanks for this guide which allowed me to successfully replace my screen! I found a few guides but this was definitely the clearest and easiest to follow.
Just some tips for others following the process – I would advise that when removing the earpiece speaker, it is best to have the screen facing you and use a pry tool or similar to push into the small grill cutout in the screen and push the grill out of the back of the phone. I had tried instead to pry it out from the back and the speaker came apart and it was very tricky to get the wire coil back in place. When I turned the phone back on the sound was quiet and distorted. I’ve managed to take it apart again and repair it but it still seems a bit quiet so may buy a new speaker.
Also, it is worth noting that when removing the ribbon cables, the black clip for the front camera lifts away from the board and towards the bottom of the phone and the black clip for the lcd ribbon cable lifts away from the board and towards the top of the phone. It took me a while to work that bit out and it’s difficult to get the pry tool underneath the clip.
Thanks again and good luck to anyone else having to replace the screen.
I’ve had several issues trying to fix a friends Moto G. The main issue I have now is the screen shows nothing but a snowy type white noise just like old fashioned rear projection TVs used to do when the aerial was unplugged. I bought another screen but the same thing happens. Any ideas?
Hmmm, From my expertise, I think that your phone’s screen may not be the issue, but rather the slot where the ribbon cable pushes in, or the phone’s video or graphics system itself.
Good Luck!
Hi,
I replaced the screen and is not working. The phone boots because I listen the vibration but the screen remains in black.
The screen replacement have the speaker and I have not taken out as you in step 11.
Do you know if I miss something please?
Thanks & have a nice day!!
In my repairs of the Moto G, I found that the phone might not boot, but yours seems to be starting up. I’d recommend checking each ribbon cable for tears, and for a solid connection, so to speak of the ribbon itself. Make sure the ends of the ribbons are as deep into the receiving slots as possible. Good Luck!
I just replaced my screen and everything is displaying beautifully, however, it is not responding to touch, so it is useless because I can’t do anything. I’ve checked the connections many times and don’t see any issues. Any ideas????
Hmmm, I’d wonder if the original (broken) screen was partially showing an image/reponding to touch ? If it was responding, and still does, then the issue would be with the replacement screen’s touch portion/ribbon not working/connected. Else, if neither the original or the replacement’s touch portions are working, then it’s possibly the phone’s connector for the touch screen ribbon, which has gone south…